
[This post is my repayment for all of the blogs I enjoy reading that discuss home projects and experimentation. This is my attempt to share my experiences so others can learn from my mistakes. The proper safety equipment is a must, of course, and the wonderful reader is responsible for his or her own safety, as there is no expert advice here.]
Once a year my OCD sets its laser sight on Craigslist, and I end up cycling through ads looking for used furniture to replace our old used furniture. Example: I just replaced the dining room table and chairs that I bought on Craigslist with another dining room table and chairs I bought from – wait for it – Craigslist.
But why stop at one dining table when you can buy two?
Yes, I bought a second table to use in our new kitchen, which I still haven’t posted pictures of, as I think the experience of remodeling it drained every bit of my willpower and energy to think about anything related to kitchens at this point.
The good news: my wife loves her new cocina. She’s upped her cooking skills in it, resulting in some outstanding culinary experiences for us. Amazing what going from cracked tile and grout to nice new smooth quartz countertops can do.
My kitchen mission is complete. Next project, please.
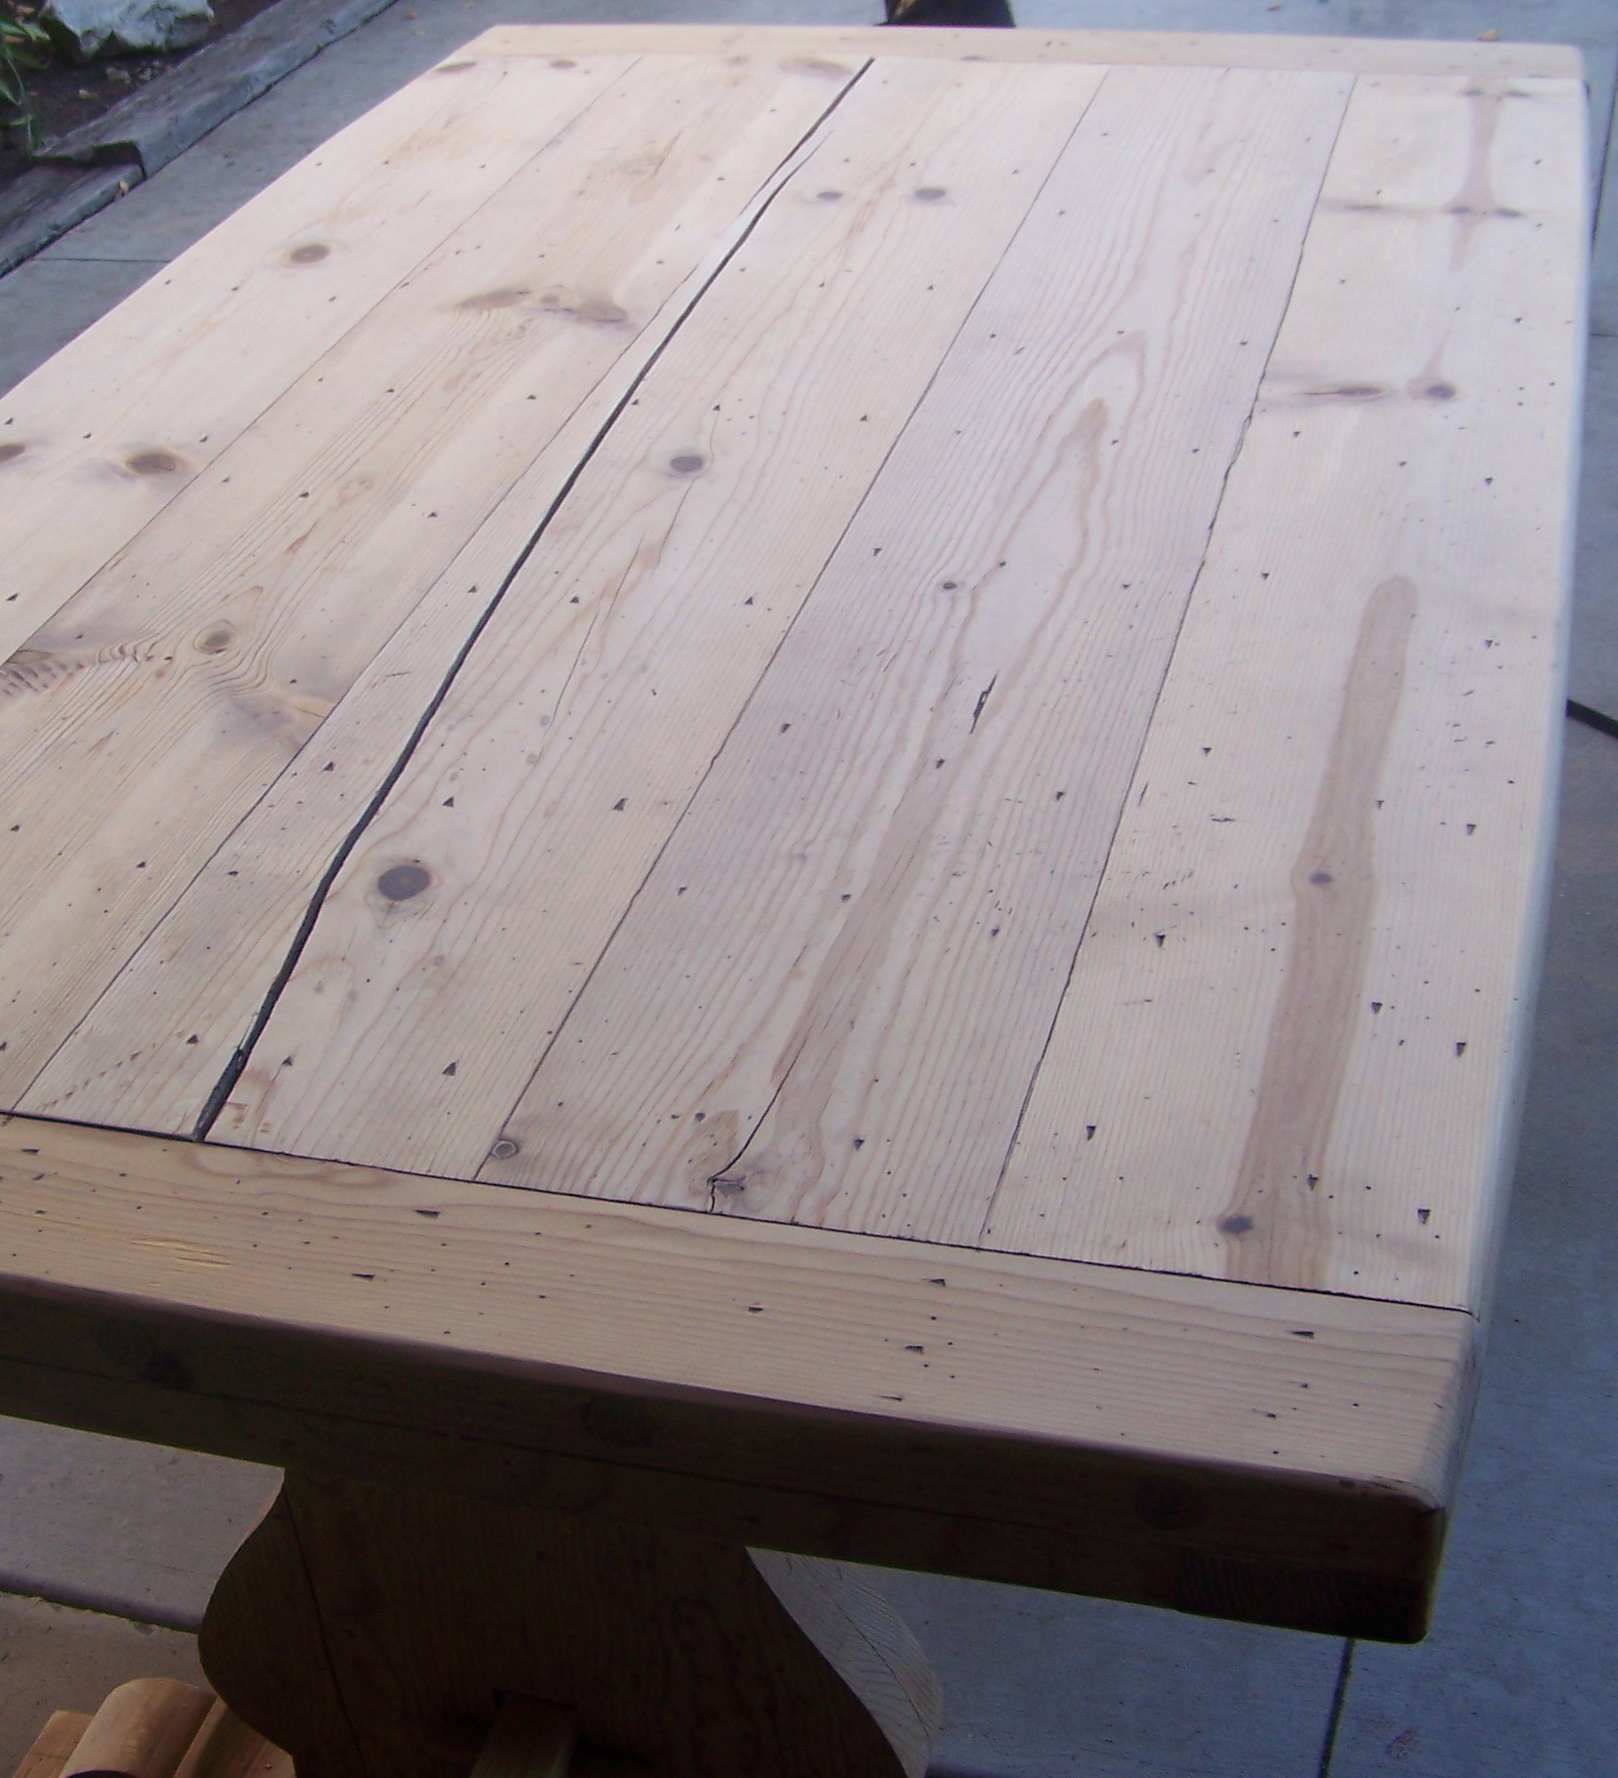
Hello, beat-to-hell, left-outside trestle table with a crack down the middle of it.

This is the “before” picture. Water stains covered it because they used it outside, and the edges were in poor shape. Luckily the stain they used was very thin and the sander ate through it quickly.
It was listed on CL for weeks at $400 than $300. I passed. But they were moving and needed to get rid of it. So, I offered $100 and got it. I figured at the very least I could repurpose the top for another project and use the trestle base with a reclaimed wood top. With that in mind, I decided I had nothing to lose on the table and could experiment.
I discovered a homemade-stain recipe on the Internet using vinegar (white or apple cider) and real steel wool. What the heck. Why not. I like the smell of vinegar better than commercial stains.
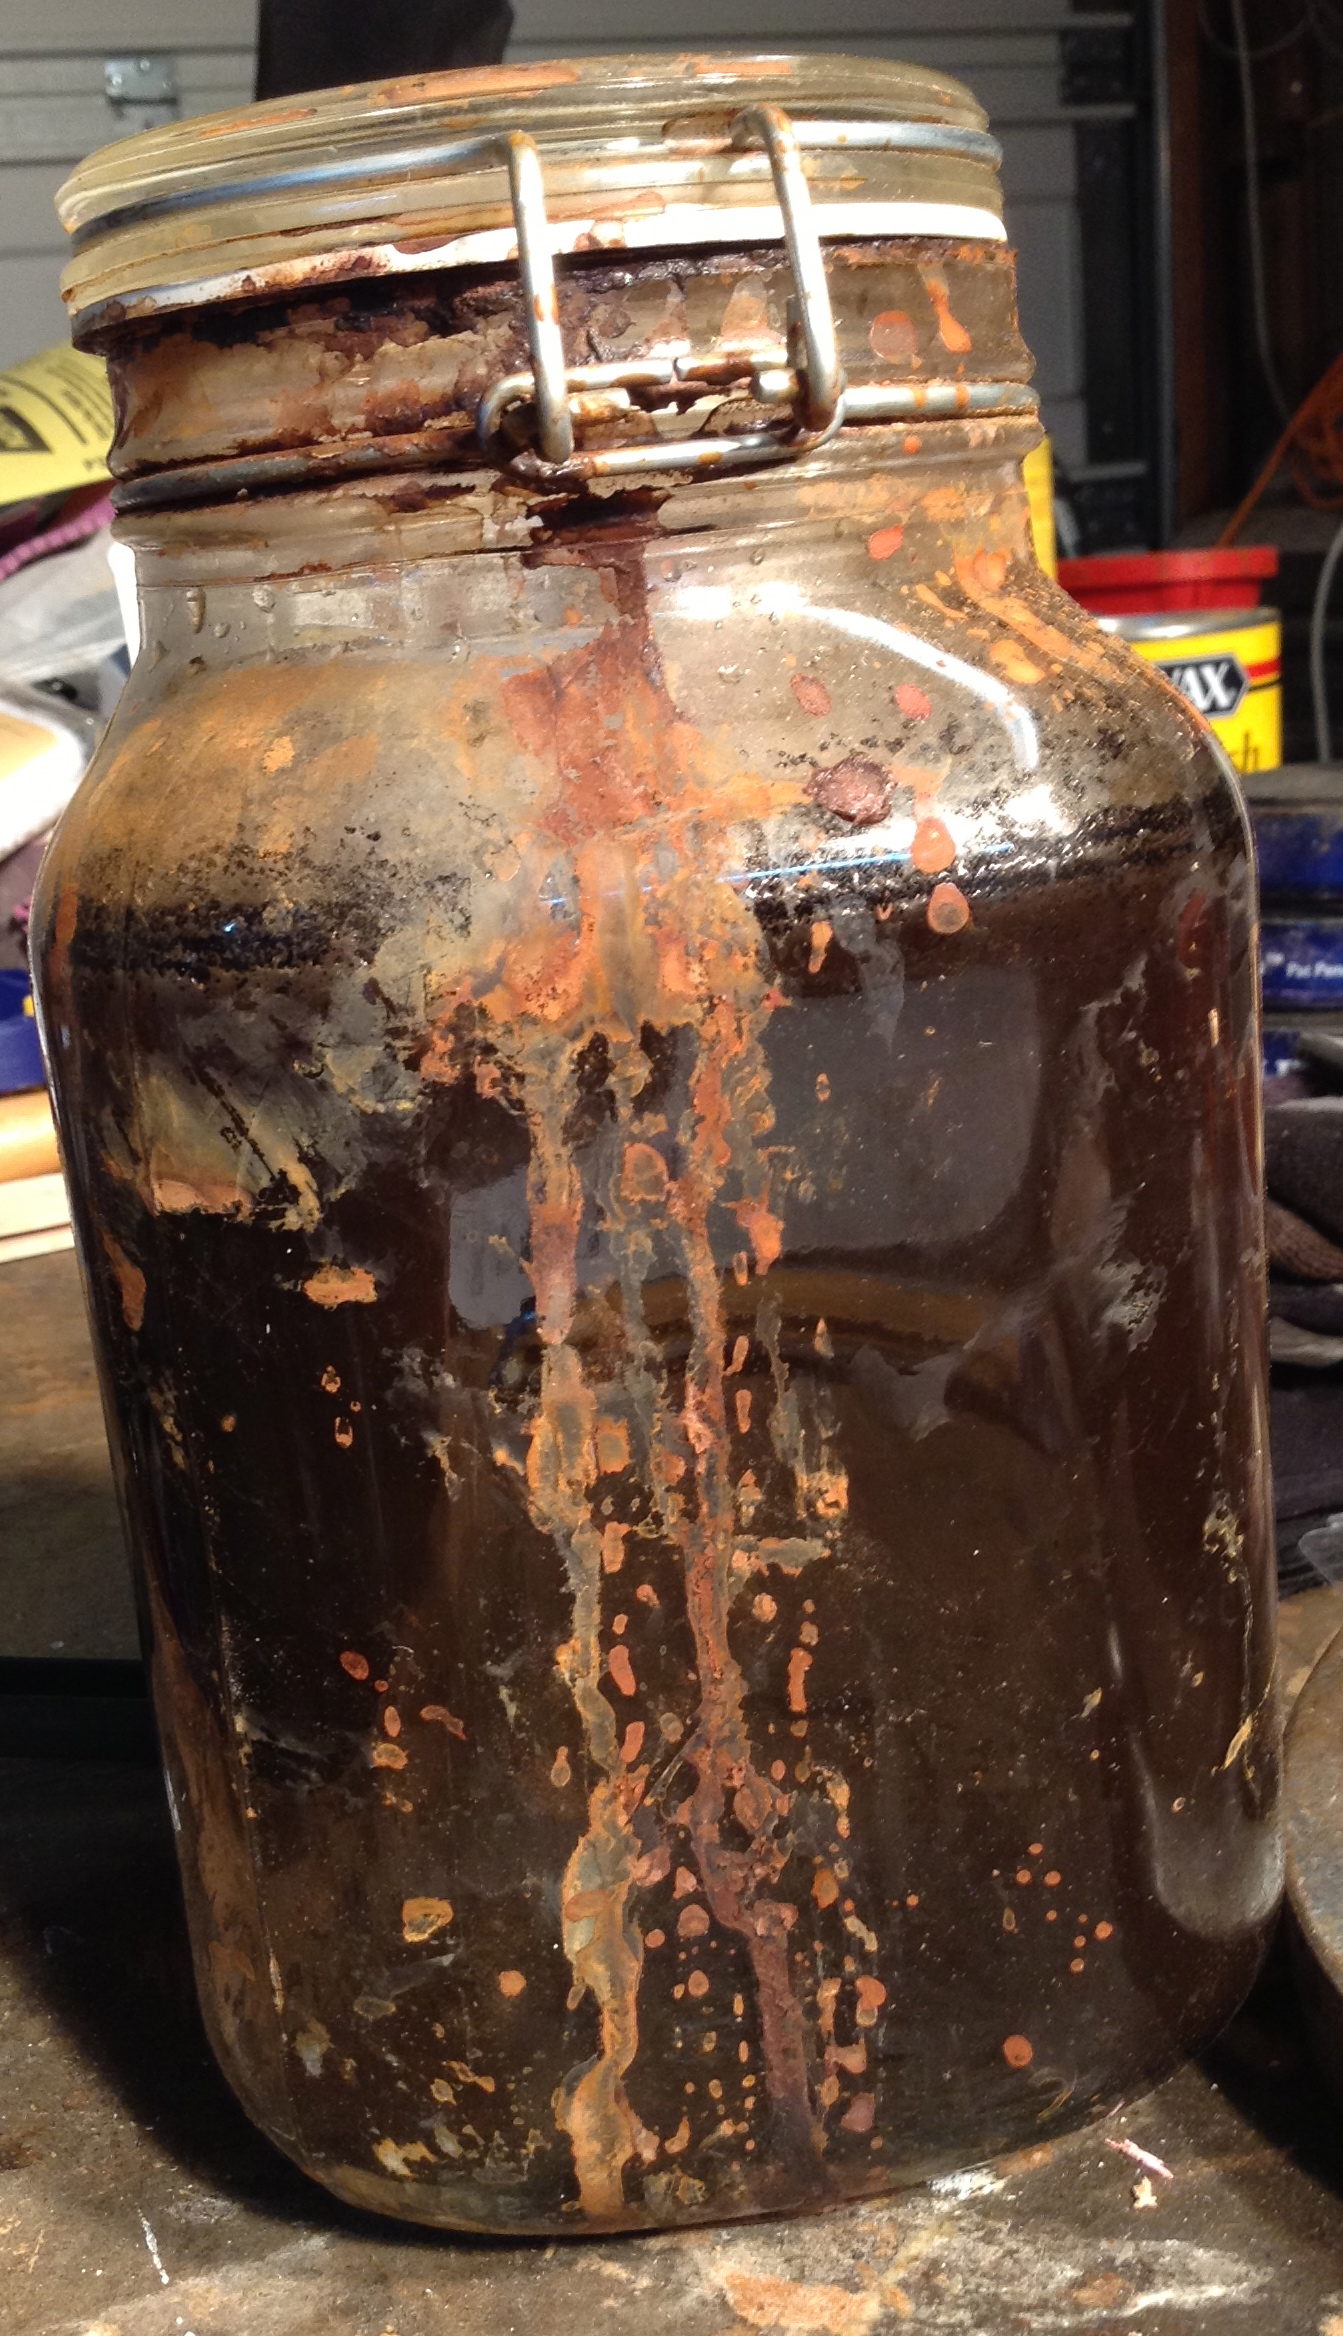
Creating the stain was an interesting process: fill a sealable glass jar with steel wool and apple cider vinegar, shut the top, and leave it there for at least four or five days, or more (10 days for this table). The steel wool slowly dissolves and blackens the mix. And each day I gently shook the jar to mix it up, resulting in a blackish-gray liquid with little specks of swirling steel (it takes weeks for the steel wool to completely disappear).

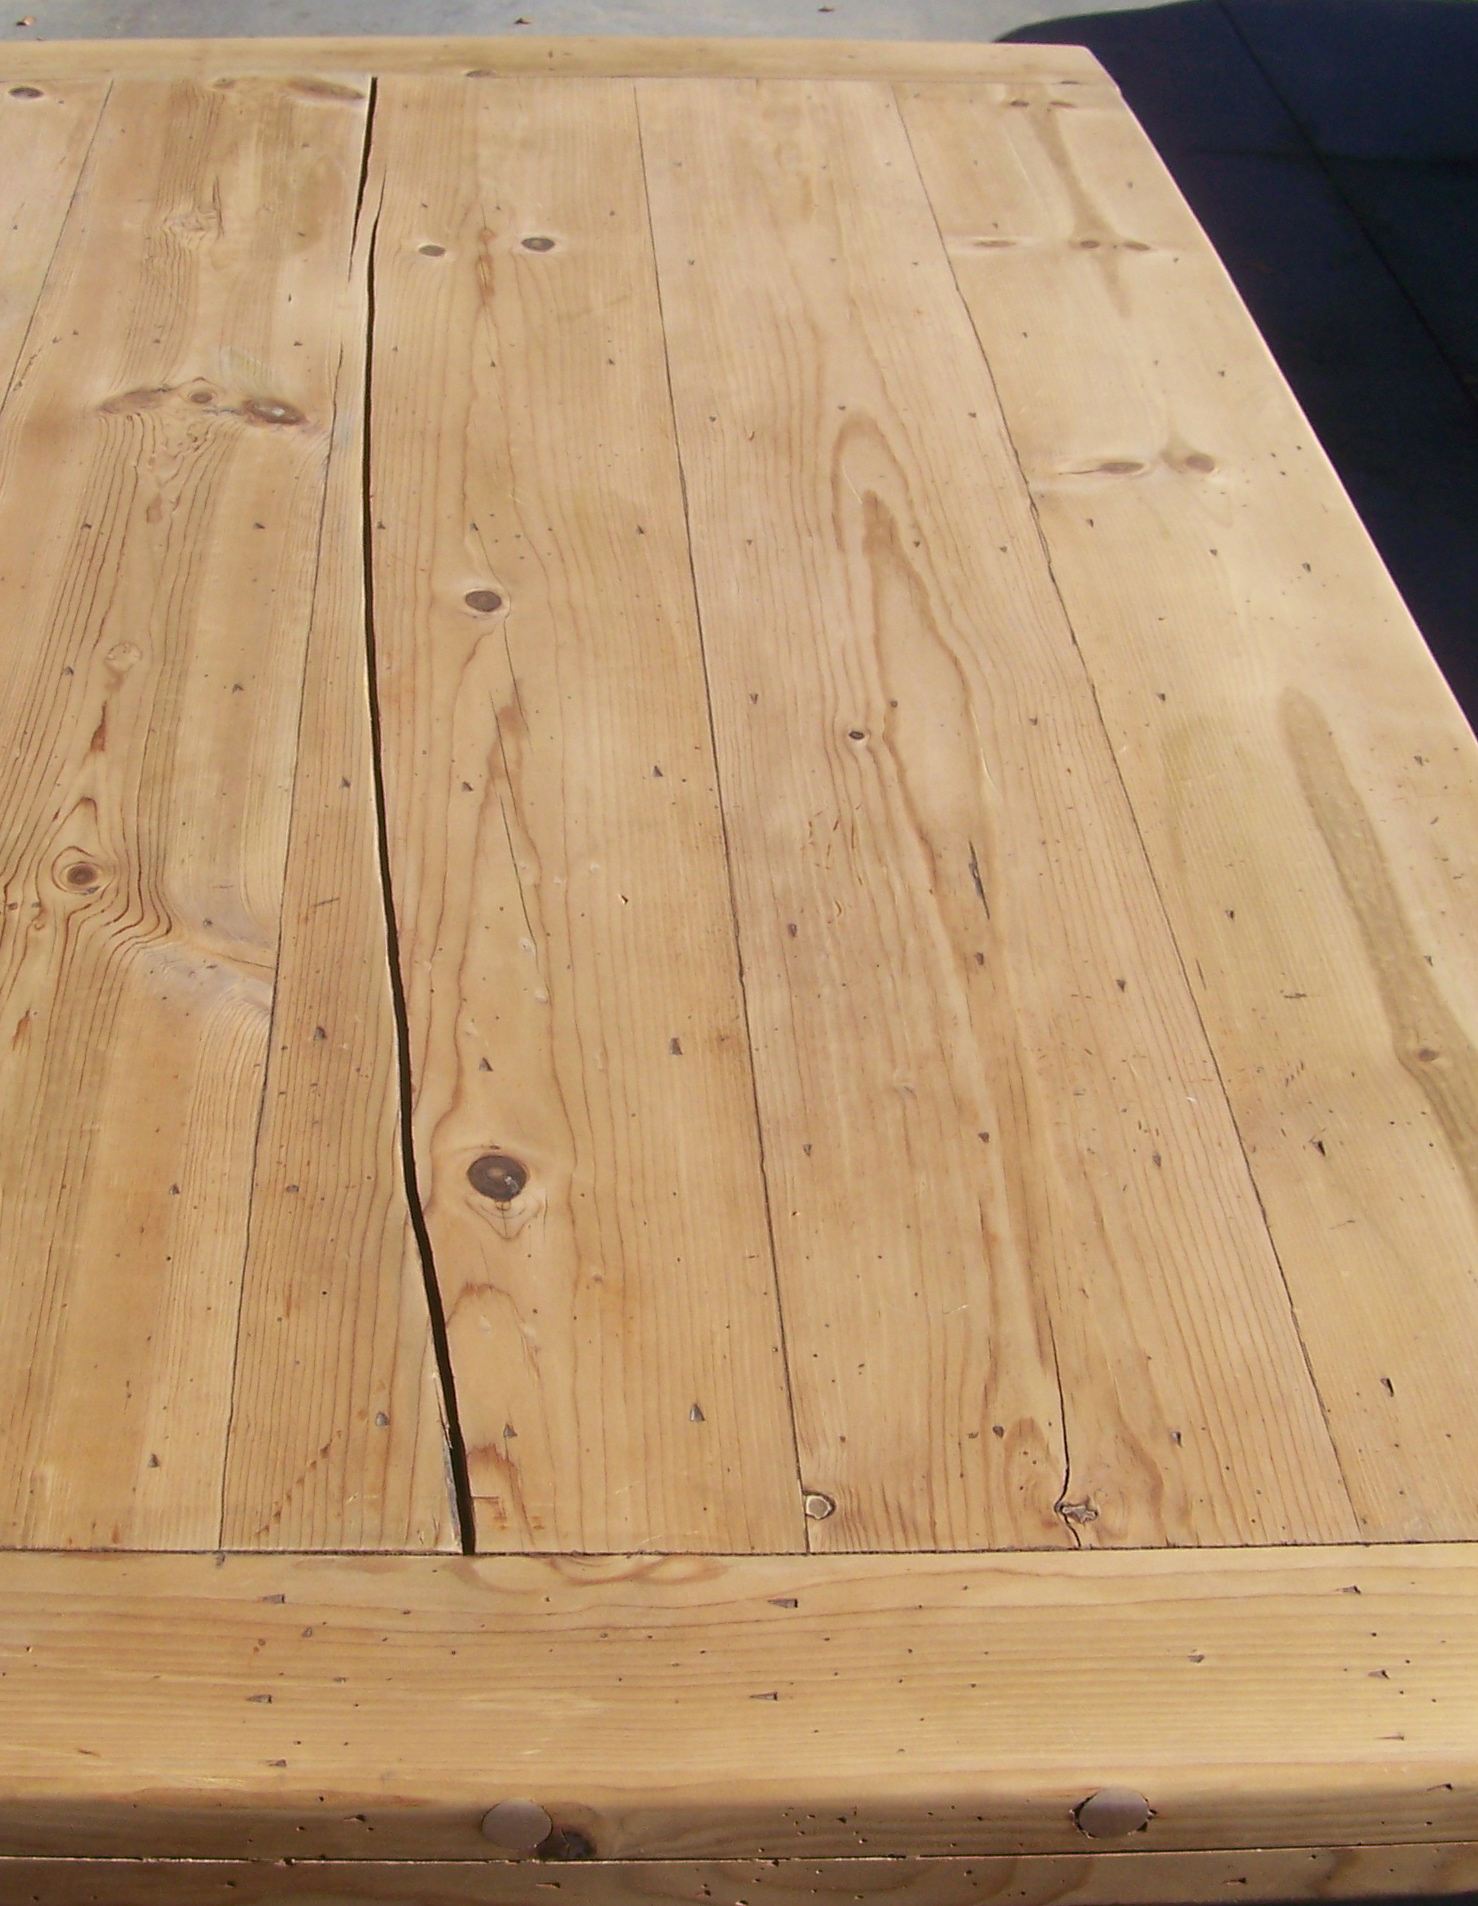
As we’re saving money in my family right now, the sanding of the table fell to me, which meant wearing a dusk mask, connecting the sander to the vacuum, and placing a large fan nearby to blow any dust away from me. I sanded the top three times, using 100, 150, and 220 grit. I was too tired to sand underneath the table three times, so I made two passes with 80 and 220. (I have since read a great book on wood refinishing and come to realize I’ve been over sanding furniture.)
4 hours and a sore lower back later, I finished.
Lesson Learned #1: Use the same type of wood to sample the stain color. I used some small blocks I had around from when I shortened the legs of a table and added wheels. Not a good idea because they weren’t sanded at all and were probably a different wood.
Lesson Learned #1.5: According to some of the blogs, you can use brewed black tea to add tanins to the wood. I tried this on a sample piece of wood but it colored the wood a shade of ebony. If you want black stain, this may be the perfect method for you. Some blogs said to add used coffee grounds to the mix for a deeper shade of black.
Lesson Learned #2. I used 50% Liquid Plumr and 50% water on the wood prior to staining. The sodium hydroxide works really well with pine to keep the stain from blotching on the wood. But I think it may have killed the gray/driftwood look I was shooting for. (Note about this technique: It’s potentially dangerous and you have to gear up with a mask and safety googles that protect against liquid splashing and you have to wear protective gloves and clothes you don’t care about. And it’s nerve racking applying it. Yes, it’s a pain, but safety first.)
The Liquid Plumr dries and turns the wood a yellowish-green. No worries. I let it dry overnight before staining.

This photo shows the apple-cider stain on the wood. Always work quickly and keep a wet edge. Don’t stop on a surface, and if you have a helper, have them help, which I did by enlisting my daughter and wife. Also, put a tarp down under the furniture because the stain does stain concrete. I learned the hard way.

This shows the stain after it has dried. It turned pinkish and I started to worry. Luckily, the pink tone wiped off in the form of a powder. I recently built a bench (future post) and didn’t have this problem. Not sure what happened. Heat of the day?

I like Briwax, even though I never seem to be able to apply it thin enough. I used Clear and you can see the side with the wax and without. I was relived when I saw the brownish shade appear once the wax was applied.

This is the finished table weeks later after my daughter beat up the wax finish. I think it turned out better than I thought it would. And, as it cost only $100, plus my labor, vinegar, steel wool and wax, I don’t mind it getting pounded. Let it age, I say.
That’s the story of my Craigslist table and homemade stain.
Here is a list of lessons learned:
- Don’t wear your sunday best – it may be a natural stain, but it still . . . stains.
- Use a strainer (I bought two made out of a mesh material at Home Depot) to pour from the master container into a smaller container. And use the small container to dip your brush.
- No puddles allowed – When the stain is drying, look for puddles and spread them out. These puddles will leave stains in the stain, like a water-glass can on wood.
- Every wood reacts differently to the stain. If possible, test a sample piece first – of the same wood, if possible. Apply your finishing coat to the sample too. You want to see the entire look. When I applied the wax, the table turned brown. You may have to experiment with different protective finishes for the look you want.
- Drying in the sun may affect the look. The table dried on a hot day. When I stained a bench on a cold night in my garage, it dried differently.
- The vinegar stain needs to sit at least four days in a sealed container. Shake it every day. This was the first point when it started to color the wood. Some claim 24 hours, but it did nothing for me after a day.
- Not sure if Liquid Plumr helped or not. Working with LP makes me really nervous and I have to gear up in my hazmat suit. Not sure I’d use it again. Maybe I’d use a pre-stain conditioner if I’m using pine.
- Work quickly – avoid drips or stopping on a surface midway. Having a helper makes a big difference on large pieces like a table.
- Stain gets everywhere. Use drop clothes. It’s very thin and drips all over the place. Well, maybe not for you. But I was working fast.
- Don’t oversand. I learned this lesson afterwards when I read a book by an expert on finishing. 180 grit is the point where the human eye can’t see scratches. That’s where I’m stopping from now on.
- Write down how much steel wool and vinegar you mixed together in case you ever want to duplicate the color, though I have a feeling it all ends up the same no matter how much steel wool you add.
All the best to you on your project. Please share your lessons learned, comments and/or pictures.

Dude, that looks AWESOME!!!
Ronnie,
Thank you very much. I’m happy with the way it turned out.
UC
Good Job!! I had to laugh because the table is the exact same one I had used for years and is, wait for it, for sale on craigs list as we speak. Check it out: http://orangecounty.craigslist.org/fuo/3584710000.html
Jodi,
Not quite exact, but close. The OC table has leaves and isn’t as thick. However, if I lived close, I might be tempted to buy it, refinish it and sell it. However, every time I put that amount of work into something, I don’t have the heart to sell it. Plus, I hate sanding. Even with all the protection, I worry about my lungs.
Thanks for the comment and link.
UC
Dear Madman of DIYShire,
Excellent post my friend, you can now wear your tool belt with pride! While reading I couldn’t help but feel that you would give Norm (New Yankee Workshop) a run for his money.
I think your kidding yourself with quitting at the 180 grit stage though, probably get away with way before that, I’ve seen the thickness of your bins!! Also the Apple-cider Vinegar mix works very well to flush ports if you run out of Vodka. 😉
I would post photos of my kitchen build project but wouldn’t want to give you kitchen envy again!
Sir Sean
Sir Sean of Englandshire,
I used to watch Norm in his workshop. I am but a flea on his table saw as far as my abilities. Part of my challenge is having the tools to do all of the cool stuff that Norm does, but he’s got the talent and makes it all look so easy getting from point A to B. His line is straight. I take a lot longer to get there and my path is filled with mistakes.
One day I’m going to put something in my port, but it won’t be ACV. Probably beer or morphine. 🙂
You and that friggin kitchen. Argh. That must be the only home improvement project you’ve ever done. Stop resting on your victory, my man.
UC
WOAH! Seriously gorgeous. I love the idea of the ACV/steel wool stain… I would imagine it’s a lot less toxic than the regular stuff. I’m pretty sensitive to chemicals, so I’m always curious to know how well alternatives work. How long has it been since you refinished the table? How has it held up since? Any different than a conventional stain?
Cindy,
Thank you very much. I don’t know the science of ACV with Steel Wool vs. store bought stains. I still used gloves with both. However, I didn’t use a mask with ACV, as the vinegar smell, though strong, did not bother me. With store bought stains, I have to use a P100 organic odors mask, as the smell causes problems with my lungs.
I refinished the table over a month ago and I see no difference in the lasting quality of the ACV and conventional stains. It’s holding up fine. It is a true stain and will stain your driveway and clothes just like a conventional stain. The thing I like about the ACV is that the wood reacts differently to it in places, so you get a better variation of color that you don’t always get with store stains.
The hard part about ACV, is how it can be unpredictable in the way it colors wood. A test piece is a must. Some of the samples came out black. However, I did make a bench, post to come, and the bench came out in brown too. I did use liquid plumr.
Thanks for the comment and questions.
UC
Good to know! I’ll have to file your tips away in my brain. 🙂 I agree – conventional stains are hard on both my lungs & sinuses, hence my interest in this method. Thanks!
Great job UC and assistants!! You have every right to be proud of the beautiful outcome. My vote’s on you for Project Master of the Year. If I ever make the bold move at refinishing another table, I’m gonna try this for sure. Thanks for the excellent tutorial!
Best regards.
Larry,
I appreciate the kind words, as always. I am getting good at refinishing after all of these years of mistakes. But I still have a lot to learn. Sometimes I skip steps I know would make something better but don’t have the tool or time.
Let me know if you try it. We’ll throw it up in a post on my site.
UC
Nice table! And you were doing so much chemistry in your DIY, it made my heart flutter. Also another tip that hopefully you did not have to experience first hand: sodium hydroxide puts holes in your clothes. It will actually feel like a soapy film on your skin (if you get any on you) before it starts to tingle. Because its kind of soap-like in its chemistry (main ingredient in true soap, actually), it spreads like crazy in the laundry. So, if you spill it on your clothes, wash them SEVERAL times separate from other stuff (best to wash with no detergent) or else you will end up getting holes in clothes you didn’t even wear that day if they are in the same load of laundry. Holey shirttails/pants are a sign of a very tired and hard-working chemistry graduate student (it’s used to clean chemistry glassware).
Dr. Nanos,
Sorry it’s taken so long to reply. I was on a business trip when I read it and forget to respond when I got back and then went right to my sleep test. Apologies.
I’m glad you’re impressed with my chemistry skills. The time I mixed and heated apple cider vinegar, steel wool, and dynamite was a disaster.
Hmm, interesting about the sodium hydroxide. Sometimes some my clothes has these odd spots where the color has worn away and pink shows up. I’m wondering now if I should have skipped blaming my wife for poor washing skills. Hmm. Haven’t seen any holes, but liquid plumr has only a percentage of sodium hydroxide.
Thanks for telling me this. I will now start wearing plastic bags when I use Liquid Plumr.
Hope you are doing well. It’s time for my massive read of your blog. I binge on it.
UC
I saw this back when you posted in my email inbox, but didnt respond. I just had to write now – this is incredible, I showed my hubby and told him to pull his finger out and take a page out of your book. (You can imagine his pleasure at hearing this.)
Great job!
Karyn, Queen of the land down under,
I’m not sure challenging your husband like that is necessary. I’m thinking your charm and good looks would be enough to sway him to build you anything your heart desires. The ways of men and women must work differently down there in Australia. Do you have craigslist down under?
UC
it turned out amazing. I too found this DIY recipe for the stain. I am looking for the right project to use it on.
Melissa,
Thank you very much. I also used it on a bench, which I haven’t posted yet, and it turned out great.
Thanks for the visit and comment.
UC
Pingback: I build a bench from reclaimed wood | The Unknown Cystic
Good to know you had no change after letting the steel wool soak for a day. I kept reading 24 hours and I’m on hour 36 with no real change.
JT, I shook mine everyday. And make sure you use real steel wool. If you have some sample sticks/wood scraps, test the mixture on them. It starts out kind of clear but darkens the wood once it dries.
Thanks for reading and the comment. If you have a picture of your finished project, please send it. I’m curious how it looks.
UC
Pingback: Great Home-Made Stain Tutorials! - Creatively Living Blog
do you sand between stain and wax? i’m in the middle of staining wood and just wanted to know if i should lightly sand between waxing?
thanks
d
Dustin,
I have never sanded during/after staining on anything. However, I guess it’s a personal choice and the look you’re trying to achieve. If you wanted a distressed look, than sanding would be the way to go. The only times I sand are preparing the wood piece and during the finishing depending on the coating. For example, I used tung oil and sanded lightly between coats.
With the wax, there is no sanding, just a lot of rubbing.
When I use the Apple Vinegar stain I just make sure it doesn’t puddle. That is the biggest challenge.
Hope all goes well.
John
Nice job and technique. Definitely worth a try.
Nice job! For several weeks now I have been trying to gear up for making sliding barn doors for a client of mine. She is a designer and partner at Inspirations: Home Decor & More. http://www.inspirationsraleigh.com . I make beautiful things for the interior design market, and she has been a client of mine for almost two decades now.
I love the aged, grayed look that the homemade stains make, so I boned up on the “how-to” and bought my gallon of white vinegar, dropped in one of my “0000” steel wool, and waited. And waited, and waited, and…………….. Nothing like what everyone kept stating. Now I’ll admit that it does tend to age the wood, but nothing like advertised. I had been thinking that perhaps apple cider vinegar might be a better choice. I use it on any mole, wart, or dark spot that appears on my face, and after about a week, they all come off and the skin is as fresh as a baby’s behind. I love that Apple cider vinegar. So it was great confirmation to know that you have had great results with your recipe. I am definitely going to go out today and pick up another gallon of vinegar, but apple apple cider vinegar instead. If it will eat up warts, blemishes, and moles, on the skin, it should work wonders with steel wool, which is ‘Fe-iron’. Add a solvent and you quickly have loads of ‘Fe3O2-Ferri coxide’.
Time for me to get with the program. Thanks! John